Showing posts with label Shimmer Paint. Show all posts

Saturday, 17 March 2012

Happy Birthday to my Mum!

A little later than planned today as I had the first of this fortnight's classes this morning, a lovely way to spend my Saturday :-)
How would you like to make cards with lovely ladies (and gents) for a living? Then why not join my team of Southern Belles? Message me for more info on becoming a SU! demo with me.
Right, last week was my Mum's birthday and this is the card I made her, I used the Faux Mother of Pearl technique again as I liked the effect so much when I made the class samples a couple of weeks ago.
 The lovley flourish is from Everything Elanor and the sentiment is Curly Cute
Another ribbon rose in Pool Party with Wild Wasabi leaves,
I used Pink Pirouette with Pool Party and Sahara Sand colour combo, a lovely subtle and pretty mix with a couple of Vellum card flowers on the Borderlines vines
and more vellum inside too
Well, I hope you liked today's card, Mum did, thankfully ;-)
 I will be back tomorrow with details of my next class (31st March, 2nd and 3rd April) this class runs from 9.30-12.30 and we will be making 10 cards for just £14.
Thanks for visiting today
Stampin' Hugs,

Monday, 23 May 2011

3d Flower Card, Mounting it onto your card


Good Morning,
I hope you enjoyed yesterdays tutorial (you can see it HERE) and if you stuck with it right 'till the end then well done! If you have no idea what I am talking about, then please look in my side bar for a link.
If you do make one of these flowers then please send me the link, I would love to see :-D
And if I met you in Lyndhurst at the craft fair yesterday, then Welcome :-)
So, I promised you a way of mounting the flower onto your card, it is quite deep so I think it will be a jiffy bag job to send or better still, wrap your card in cellophane, tie it with a pretty ribbon and hand deliver to your friend.
I recommend mounting your flower through a mat on the front of your card, that way it isn't a little point trying to stick to the front of a card and possibly ripping off! eek!
So first you punch a 3/4" hole into your mat,


Next add your ribbon "leaves" I stuck mine with DST, attach the mat to your card with dimensionals then add a line of glue (tombow) around the circle and in the middle as shown,


Stick your flower holding the lower layer of petals to the mat to stick, (this is where tombow is great as it sticks quickly and firmly)

TOP TIP: Now I am sure most of you know/already do this but I will mention it anyway, just in case.
I decided that I wanted to spritz just my flower with shimmer spray, but I didn't want it all over the rest of the card. So I put post it notes all around tucked under the edges, spritzed and then removed them... quickly ;-)

And this is the finished card :-D
Sentiment is Curly Cute with Seam Binding ribbon leaves and Elegant Soiree DSP.

And a close up picture of the flower,
Well, I hope this has been of some help to somebody and I look forward to seeing your creations,
Stampin' Hugs,

Friday, 11 March 2011

Spiral Flower Tutorial

Good Morning,
I love it when you make projects using my tutorials but please be sure to link back here and give credit when you make and post to your blog.
Thank-you for your understanding and I hope you enjoy this tutorial xx
I have a had a couple of requests for a tutorial to make these little flowers as shown on THIS CARD so, as requested, here it is!
It is really very simple but with just a couple of little helpful hints along the way ;-)

Supplies needed are here. Just a couple of points here; I used both sizes of punched circles on the card above but for this tutorial I have used the 1+3/8", you can of course use either or both sizes. Also I would highly recommend using Tombow Glue as it dries quickly and very firmly, much faster than ordinary PVA, which is a real bonus! more on that later...
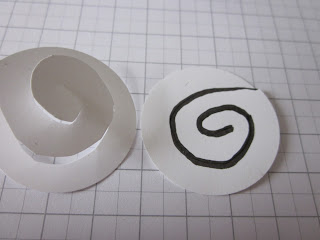
Next you need to cut a very basic spiral as shown, Top Tip here is don't be tempted to make a really narrow spiral, it is too hard to roll and hold and also make your flowers too flat,
Next, start rolling from the outside point,
Add a large dollop of glue to the flatish piece at the bottom,
Now, HOLD, for a good while ;-) perhaps 2 or 3 mins so the middle sticks well to the bottom. If you read yesterday's post this is why it took me far longer than it should have as I was making a few of these I kept letting go too early and they would spring up when I looked away! he he!
So, once the centre is stuck I would recommend leaving them sat under something heavy (like a punch) for a few more minutes, they are very sturdy so won't buckle under the weight, don't worry,
And that's it!
Of course you can always add the little Platinum shimmer paint to the rose to finish using a sponge dauber, Tip I get my paint from out the lid once I shake the bottle,
 All supplies used here are Stampin' Up!
If you would like to order anything or you wold like me to come and demonstrate this technique (or any other) to you and your friends then please email me for details.
I hope you have enjoyed today's tutorial and many thanks to you all for stopping by today,
Stampin Hugs,

Thursday, 10 March 2011

Diamond Wedding Wishes

Hi there,
Do you ever have one of those cards that start out simple, you think it will be easy(ish) in your head but yet it takes forever??? Well this card is one of those sort! I started with my (sadly neglected for too long) Medallion stamp, inking it with Platinum Shimmer Paint using a sponge dauber..
Then I moved onto making some pretty flowers except every time I let go of one of those little cuties it would be seem ok, I would turn round and up it had sprung...more glue, more holding, more sitting it under a punch! Lol! Obviously I need more patience?! Who? Moi?  I finished them off with a dab more shimmer paint.
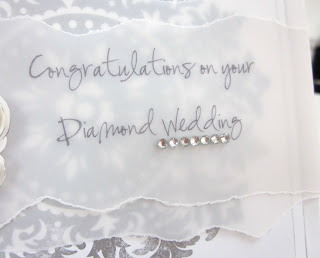
Sentiment is computer generated and printed onto White Vellum Card stock, it is such good quality this vellum, so lovely and thick to use, I also added a few Stampin' Up! Basic Rhinestones to bling it up a bit,
and finally I added a little strip inside to finish it off,
Having said all that I am pleased with the final card, even if it did take a lot longer than anticipated ;-)
Do let me know what you think??
Thanks for stopping by today and listening to me babble on. I hope you have a great day whatever you are doing, especially if it involves ink and/or paper ;-) 
Stampin' Hugs,

Friday, 7 January 2011

OSW with SAB set!

Good Morning,
Don't worry, the first week back is nearly over, mine are shattered ;-)
So today I have a One Sheet Wonder to share with you, but I decided to make a pretty box with a matching card.
Here is the pattern, I used an A4 sheet of Whisper White card and the FREE Sweet Summer stamp set inked in Melon Mambo, Tempting Turquoise and Wild Wasabi again, I also used the Spritzing tool with the matching Markers and then finally I sprayed it with Shimmer Paint mixed with Alcohol to give a gorgeous pearly finish,

Here is the card I made, I mounted the flower heads on dimensionals and added a couple of sparkly Rhinestones,


and this is the little box I made, I used a sizzix die hubby bought me for Christmas, wrapped it in Marina Mist Wide Striped Grosgrain Ribbon and added a matching tag,

and here they are both together,


Thanks for stopping by and I hope you like today's projects, do leave me a comment so I know you have popped by
Keep warm today whatever you are doing,
Stampin' Hugs

Tuesday, 20 July 2010

Another Graduation Card

Hello,
I was asked to make a Graduation card for a girl again this week, the hard part was that it was for the same girl as before! eek! Isn't that the hardest?? making more than 1 card for the same person is just the toughest. Anyway after looking round for some inspiration I found a template to make this Mortar Board card, I have changed it around a bit to suit what stamps I had and used a Rich Razzleberry colour scheme but all the measurements are the same,
Sentiment is from Live Your Dream, I thought it was very appropriate for graduation, glasses are from New Years Celebration which I coloured using a blender pen and Champagne Shimmer paint, I die cut a photo turn to keep the card closed and a simple Congratulations is inside,
and just a side view for you, Isn't the ribbon tassel great? I just unpicked and frayed some spotty Razzleberry Ribbon,


Well that's today's card for you, I have Zack's sports day this afternoon but I will be back tomorrow with Teachers cards and gifts before I go to Zoe's sports day,
Thanks for stopping by,
Stampin' Hugs,

Monday, 19 April 2010

New Bird Punch

Good Afternoon to you all,
I hope you are all enjoying the glorious sunshine??
I have another card we made at Saturdays class to share with you today, and as you can probably guess from the title it uses the lovely New bird punch which is in the mini catalogue. It's a fantastic new space saving design which folds flat for storage, V. clever, but with the same punching capabilities as the normal punches.
Card base is Ruby Red which I scored at 1/2" intervals (to resemble wooden boards??),
house is Kraft card stamped with the lovely vine from Vintage Vogue (mini p, 14) with Versamark, the roof is Sweet Pea DSP (mini p, 13), I hope you can see that we sprayed the house with white shimmer paint (Mini p, 21) (mixed with alcohol,) to make it all sparkly. Bird (mini p,6) was punched from the same paper with the bird turned round to show her stripey side,
Tiny tags (min p,6&15) used again in Ruby Red ink, tied onto yummy Choc Chip Satin Ribbon (min p, 11) with linen thread and topped with stitched felt circle (min p,13).
here is the arty angle, we raised the house up with plenty of foam pads for dimension,
I hope you like this one, I will be back tomorrow with a very different way with the bird punch and some more lovely shimmer ;-)
Thanks for stopping by,
Hugs Sarah-Jane xx
Related Posts Plugin for WordPress, Blogger...