Showing posts with label How To. Show all posts

Tuesday, 23 April 2019

Flowering Desert with a Video Tutorial to "Extend Your Stitched Rectangle Dies."

Hello there,
I do hope you've had a wonderful bank holiday weekend? And what wonderful weather we had in the UK! I'm loving being able to sit outside ;-)
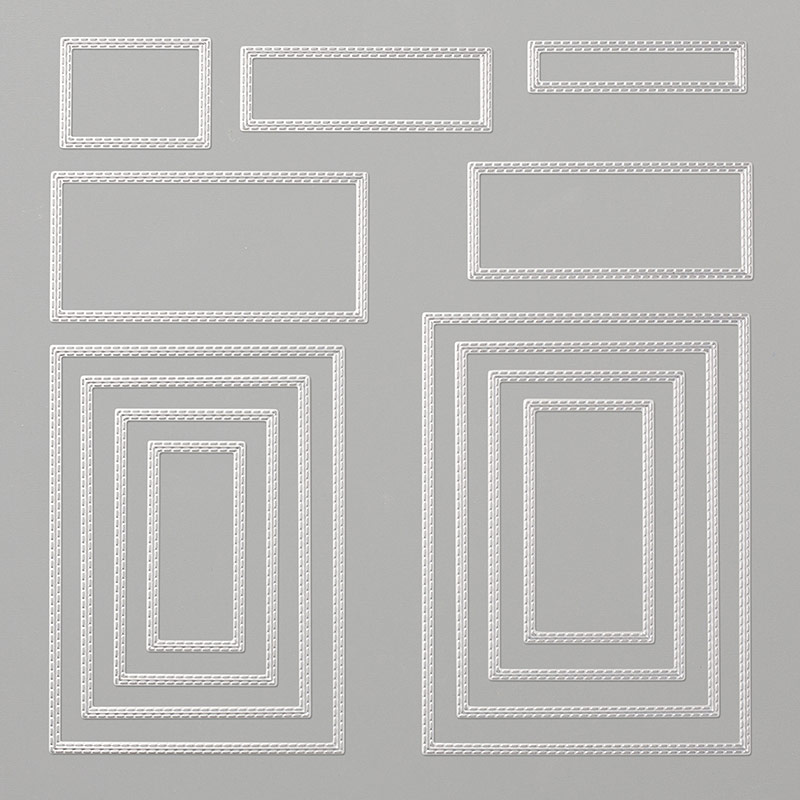
Anyway, I actually have my last promised video (I mentioned it HERE) to share with you how to extend the length of your stitched rectangle dies today! I know, I've been really rubbish about videos lately but this was so quick to make and took very little editing (read: I didn't mess it up as I made it!) so here we are.
I'll start with the card first. I used the Flowering Desert stamp set to make this card as I needed to repeat my steps for the video. I really love this stamp set and I'm sorry it's hit the retiring list :-(
 Although I'm really grateful these dies are staying because I've used them a ton already!
 So, let's have a look at this video, shall we?
I've kept the rest of the card fairly simple and for some reason the writing hasn't shown up too well in this picture, it's the stamp in the corner you can just see- "be your own kind of beautiful"
And here's an image to "PIN" so you can find it again easily!
So, that's it for today.
I will be back with another make tomorrow but 'till then, happy stamping :-)
      Shop Online With ME!
Host code for April spends over £25 and under £150 is RZFNWVK9  

Stampin' Hugs,

Wednesday, 3 January 2018

Spring/Summer Catalogue and Sale-a-Bration 2018 Launch!

Happy 2018! Today sees the launch of the brand new Spring/Summer catalogue, Sale-a-Bration, the most exciting time of the SU! year!
This is my first, of two, blog posts today so please do check back later for a card or hit "Home" to see the most up to date post :-)
So, let me start with the awesome, brand new Spring/Summer catalogue! It's jam packed full of yummy new and exciting products, lots of fun stamps, papers and accessories!!
 Click HERE to see or on the catalogue picture below...
 And of course it's time to Sale-a-Brate too!! There are (as always) three ways to earn FREE products during Sale-a-Bration, let's start with a look at the FREE products you can choose from when purchasing any current SU! products - That includes products from the clearance rack, carryover products and both the annual catalogue and the Spring/Summer catalogue!
Click HERE to see the choices (they are so cool!) or on the catalogue image below.
PLEASE NOTE: There are two levels of products to select this year, more info just below the catalogue image/link below...

------SHOP------
For every 60 €/£45 you spend, you’ll receive a free Sale-A-Bration product of your choice. For anyone who has enjoyed Sale-A-Bration in the past, there is an exciting new announcement for this year: We now have a new reward level, giving you more flexibility and options for your free items.
Let’s break it down:
  • If you spend 60 €/£45, you can choose one free level 1 product.
  • If you spend 120 €/£90, you can choose one free level 2 product, OR, you can choose two level 1 items.
  • If you spend 180 €/£135, you have the option to choose three level 1 items or one level 1 item and one level 2 item.
This new option allows everyone to create a truly personalised Sale-A-Bration experience!
Plus there are no limits to the amount of FREE products you can earn, just sayin'!
------Host------
Sale-A-Bration is a great time to host a crafty party! When a host holds a qualifying party with at least 275 € | £200 in sales during Sale-A-Bration, they’ll earn 27 € | £20 more in Stampin’ Rewards!* These rewards can even be applied towards a Starter Kit, allowing you to also join and become a demonstrator.
*Additional Stampin’ Rewards can also be earned by an individual purchase or order of 275 € | £200 or more.

------Join------
In addition to hosting there's also fantastic benefits to joining as a Stampin’ Up! demonstrator during Sale-A-Bration. Joining at this time gives you a starter kit for 129 € | £99, along with the choice of TWO additional stamp sets in your kit—any stamp set, any price.* Plus, the kit ships for free!
*Excludes bundles and Sale-A-Bration sets.
OK, so that's the low-down on the new products you can choose from today! If you have any questions or would like a physical copy of the new Spring/Summer or Sale-a-Bration catalogues then please do drop me a line at sarah-janerae@sky.com
I'll be back later with a card, 'till then happy list making!
   Shop Online With Me
Stampin' Hugs, 

Wednesday, 29 November 2017

Inspire. Creat. Stamping Challenge #006 - Fancy Folds!

Hi there!
Today it's time for another challenge at Inspire. Create. Stamping challenges.
I can hardly believe it's already week #006! And the theme this week is "Fancy Folds".
Now, I don't generally too make many fancy folded cards, I've been tending to stick to CaS cards of late, so I decided to dig through the archives on here and revive a fold that once I had re-made it I do wonder why I haven't made more of them! And it's always good to be pushed from your comfort zone, amiright?
So, to see the original design with a FREE tutorial too, go HERE. And this is my updated version using the Christmas Around The World DSP...
 I love the images and also the grey snowflake background on this paper. This is the same piece, just different sides. I'm always torn which side to use when they are both this nice ;-)
So, you can gently ease the top out from behind the tab at the bottom...
And then you can write on the back of the piece with the circle or the centre panel. I chose the circle panel and decorated it with some offcuts of DSP.
 So, the original tutorial used punches (including the retired 2.5" circle) and if you have them already, great! However here are the correct sizes to make this card with the Layering Circle Framelits :-)
The hole in the card base can be made with the second largest circle die, the small tab can be made with the smallest circle die and the popped up circle can be cut with the third largest die...
...but, I used the stitched edge die (for the popped up circle) which is the same size as that third largest die I mentioned before.
 So, I do hope you have a go at this card, it really is much easier than it looks and make a fun change to the regular shaped card which is always fun!
Don't forget to hop over to the Inspire. Create blog and see what the rest of the DT have made :-) And you can share your creations there too!
Thanks for looking today!
   Shop Online With Me
Stampin' Hugs,

Tuesday, 10 January 2017

Five Pencil Gift Box Video Tutorial

Hello!
OK, so I know yesterday I said I was done with Christmas sharing and I am, kind of..... but I made this box for Christmas gifts and did a quick video tutorial too but simply ran out of time to edit and upload it. So, as it's a good size box I thought I would share it with you today and then tomorrow I will share an updated, non-christmas version with you too! Double bubble! Sound good??
So, I have called this a five pencil box because, well, it fits five pencils across, simples! Take a look....
 I used a tag from the Tin of Tags kit and backed it with a copper foil paper layer...
... and these yummy copper bells I picked up in town. 
In the video I share with you how to thread and wrap these to get this look easily :-)
So, without further adieu, here's the video!
Please do watch the video for tips and tricks but for those of you who like written measurements too, here you go :-)
Measurements in cm: Paper size: 23cm x 12.5cm.
Score points for long side: 1.5cm in from each end.
Score points for short side at 1.5cm, 5.5cm, 7cm and 11cm.
Measurements in inches: Paper size: 9" x 5+1/8".
Score points for long side: 5/8" from each end.
Score points for short side: 5/8", 2+1/4", 2+7/8", 4+1/2".
And one final photo to finish.
So, I'm off to my craft room to make a non-festive version and I'll be back with that tomorrow :-)
All that;'s left for today is to say I hope you have enjoyed todays video and thanks for looking,
     Shop Online With Me

Saturday, 17 September 2016

Pocket Fold Cards - Two Ways! With a Video Tutorial using the Floral Boutique by SU!

Hello!
I have a pair of pocket style cards to share with you today using the gorgeous Floral Boutique suite.
I made two versions to allow for if you have the dies (but you do need them ;-)) and if you don't.
I have also made a little video tutorial to go with them explaining the measurements and a few tips including how to use a stamp-a-ma-jig to get that stamped line straight on the inserts!
OK, so if I had to pick a favourite I would choose this die cut version as it slightly prettier than the other one, I just think the dies add that little something extra. And if you've got the dies this is another great way to use them.
So, this version uses the edge die on the outer pocket.....
And I used the smaller floral die across the bottom inside, love how the navy behind pops!
And this one is if you don't have the dies, just the stamps and DSP. Just as pretty and easy to make in multiples too!
As much as I like the die cut version this is the one that I think would transfer well into many other cards, can you say Christmas?? or just try it with different DSP's...
I stamped at the bottom of this insert as well as across the top edge.
So, how about a video tutorial sharing how I made them...
And both together again to finish today.
Well, I hope you have enjoyed todays post and this pair of cards, which is your favourite?
  Shop Online With Me
Thanks for looking today! Back tomorrow with another card :-)

Related Posts Plugin for WordPress, Blogger...