Sunday, 4 December 2011

Folded Tree Tutorial

Good day to you!
I have the tutorial today for the tree I showed you HERE.
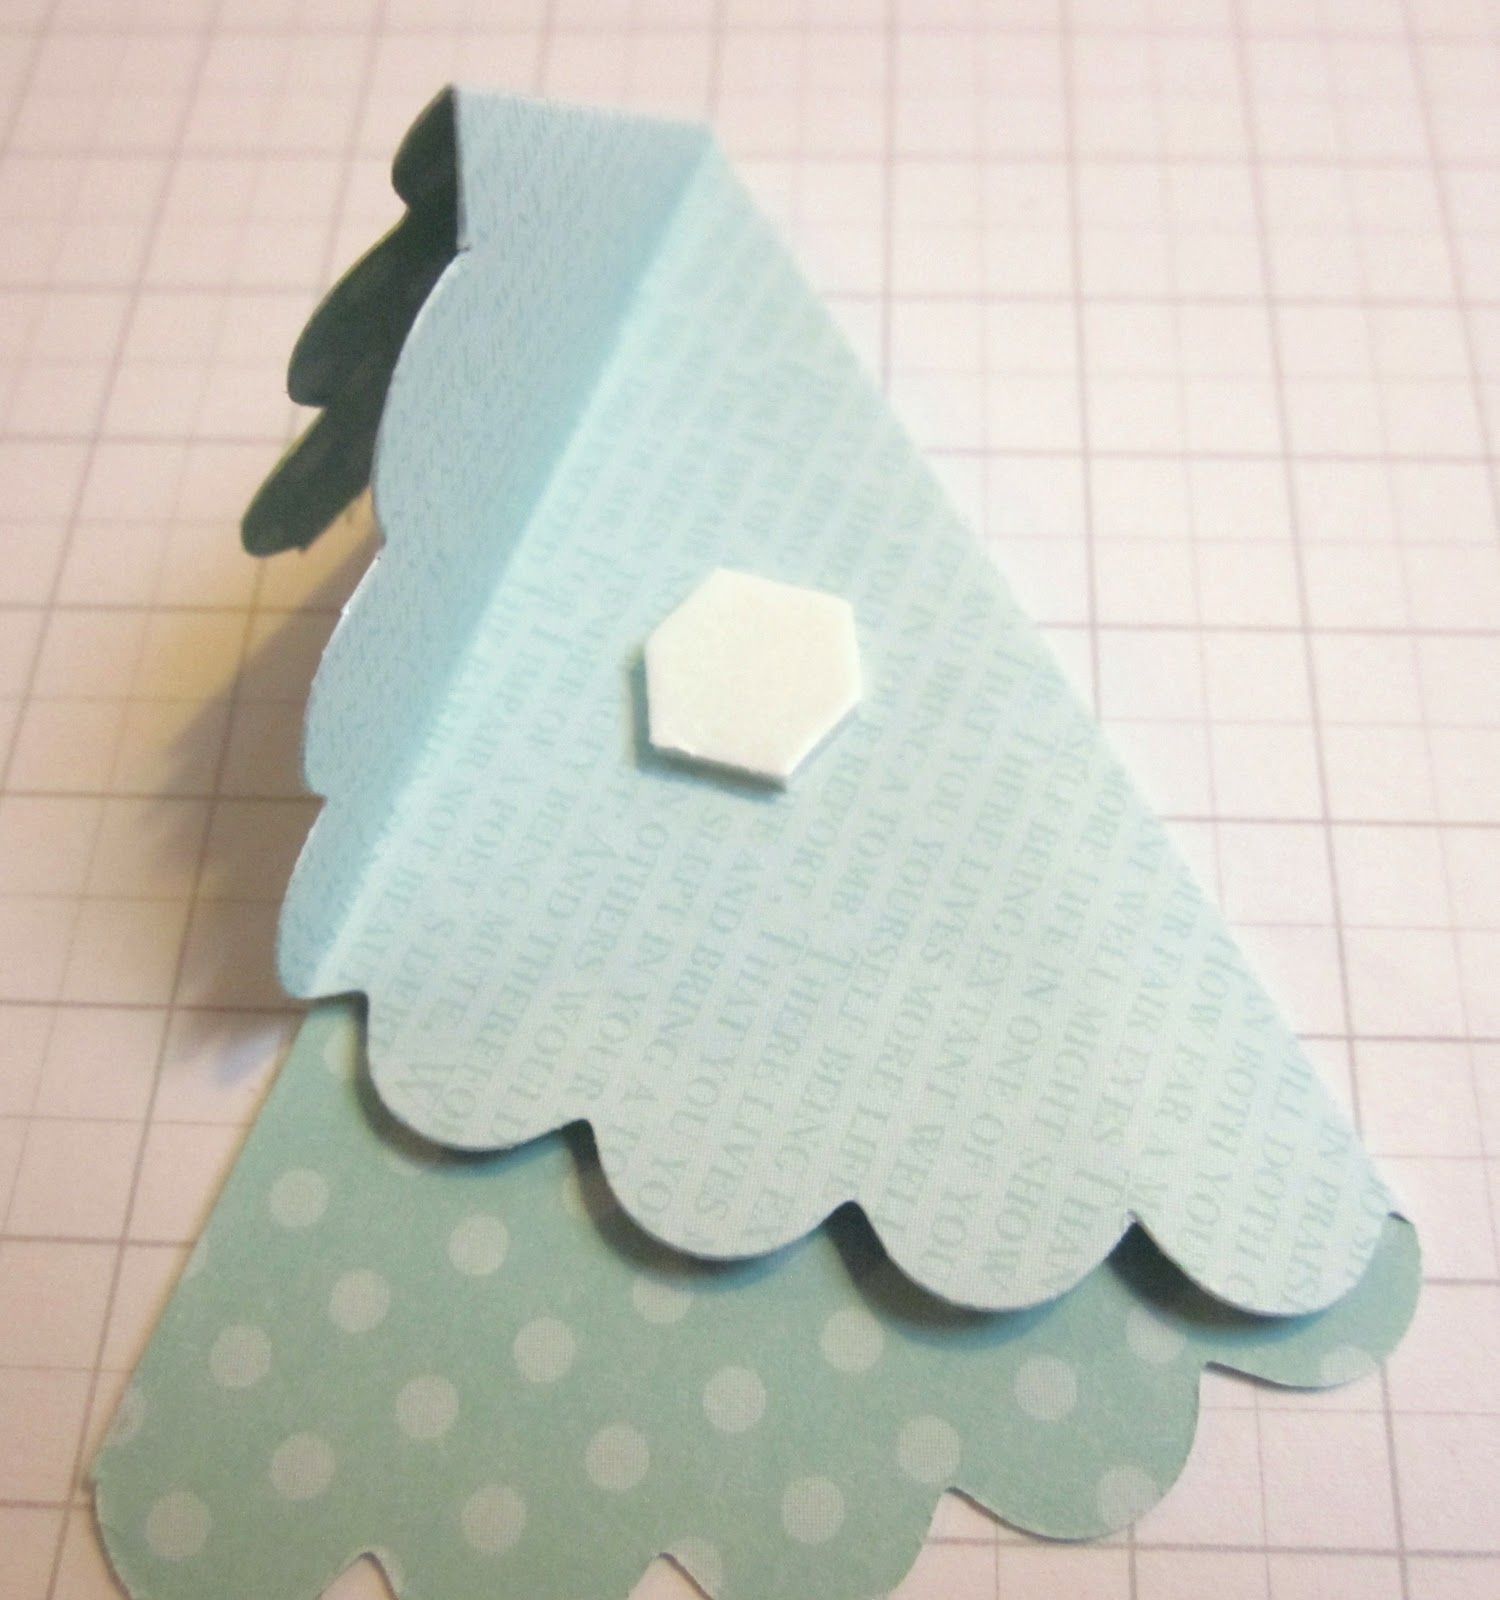
I wanted to design a folded tree that wouldn't overhang at the sides and this is what I came up with...
To make this you need limited supplies of a cutter, bone folder, adhesive, a pencil and ruler and I used Stampin' Up's Scallop Circle die with the Big Shot, but you could use a circle approx 10.5cm wide.
So, to begin with you need to cut your scallop circle in half, the easy way to find the centre is to gently fold in half and pinch at the top and bottom to mark, you need to do this at the lower point between the scallops,
Next, measure along the straight edge, again from the bottom of the scallop, to 3.4cm
Fold at this point ensuring the straight edges meet.
Next fold the smaller, top section towards yourself so the cut edge is parallel to the first crease.
Unfold the top folded pieces and then fold the lower larger section so the bottom cut edge runs along side the first crease.
Re-fold the top and that's it!
For the best look add dimensionals at the bottom edge of the scallops and add a dab of glue to the top point when you fold to secure.
Adhere to your card for a pretty Christmas feel, the pot was punched with the small tag punch and the background is stamped with Serene Snowflakes in Pool Party
Thanks for visiting today and I hope you have enjoyed this mini tutorial, if you have a go at making this I would love to see it :-)
Stampin' Hugs for today, 

Friday, 2 December 2011

Stampers Club card for November

Hello,
I have the card kit that my stampers 6 club received this month with their order. I send out a kit each month to these lovely ladies and then a mini tutorial to accompany it, if you would like to join my new stampers 6 starting in January message me now :-)
Anyway, the card. The colour inspiration came from a swap I received at convention from my SU! sister Angela, Pretty in Pink with Pool Party,
I stamped the snowflakes from Serene Snowflakes, they are so delicate
the sentiment is from Curly Cute
and the tree is made using just half a circle die cut with SU! scallop circle die, 
 Inked edges on the tree
So, I hope you like and I will be back tomorrow with a mini tutorial for folding the tree :-D
Stampin' Hugs for today,

Thursday, 1 December 2011

FREE STAMPS AND PAPER!!

Yes, you read it right!
Running until the 15th of December if you host a workshop with me and it totals over £300 you will receive a FREE Paisley Petals Stamp Set (in either Wood or Clear) and a pack of matching Paisley petals DSP.
This bundle is worth up to £33.90!!
I have just a few dates left in November and just a couple at the begining of December too, CONTACT me now to host a workshop and earn this fab bundle for FREE!
November and December is the best time to host a workshop! Get ready for Christmas, and get that SU! wish list in your stocking this year!
Happy Stampin'

3d Swap

Hello!
I promised you a convention share today and that's exactly what I have for you! 
**Advance warning, picture heavy, grab a cuppa before you start!**
I joined in a 3d swap with some other very talented demos, but today I will share what I made for this swap,
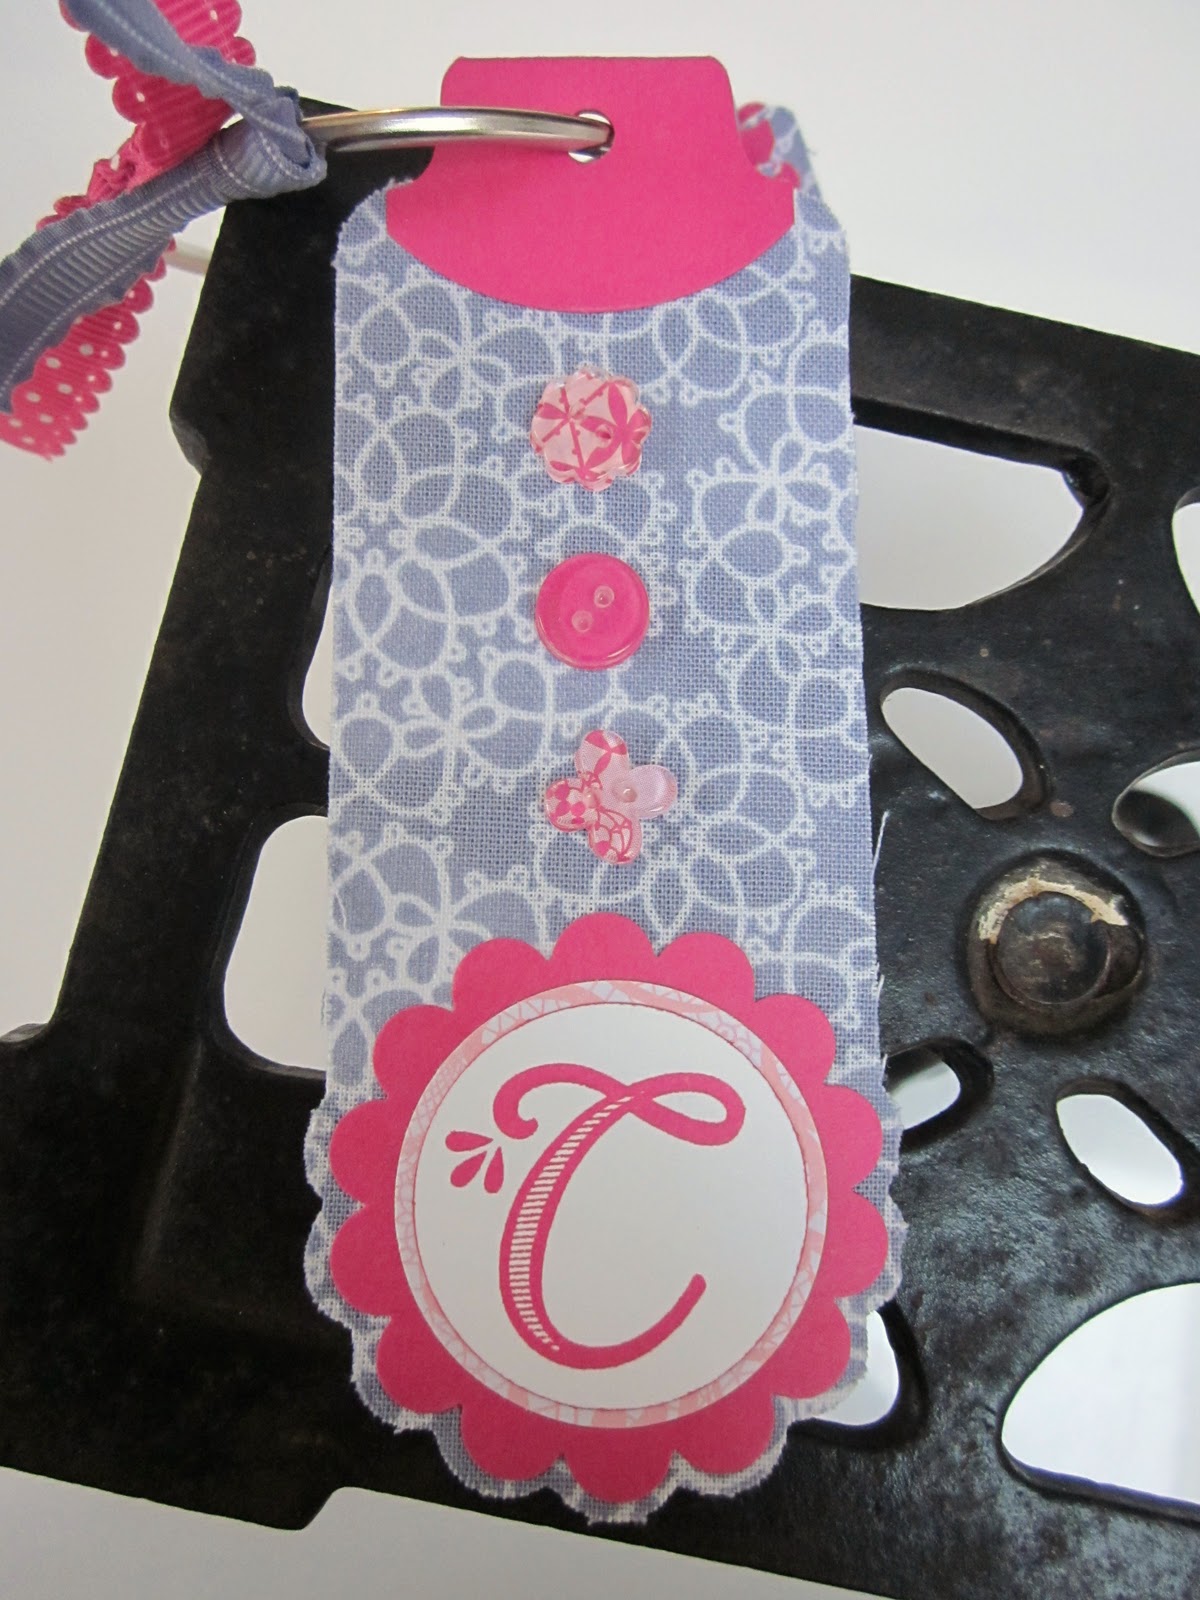
I used Flirtatious fabric die cut using the smaller of the two tags die
"C" is from Broadsheet Alphabet with backed bitty buttons to decorate too,
"R" is inked with a marker using ta stamp from the hostess exclusive Happiest Birthday Wishes set, punched and covered with crystal effects in a (new, clean) bottle cap
"E" is from Just Perfect Alpha and punched with the Heart to Heart punch and decorated with the itty bitty shapes punch pack
"A" is die cut using Timeless Type Alphabet and again coated with crystal effects,
"T" is the trunk from Trendy Trees with the 5 petal flower punch topper, finished with a flower brad,
and "E" is again Broadsheet Alpha with a mini clip to decorate it
and here it is all fanned out, spelling out "CREATE" a lovely way of showing off lots of SU! products, but wouldn't it make a darling mini scrapbook with small pictures of your kids or even pets??
Well, the those possibilities are truly endless, if you have a go, please send me a picture of your version! I would love to see ;-)
Well, that's today's post for you, I have another class today but I will be back Friday with some more craftiness for you,
Stampin' Hugs for today,

Wednesday, 30 November 2011

New Paper and Ribbon Shares!

**STICKY POST, SCROLL DOWN FOR FRESH IDEAS ;-)**
**EDIT TO SAY JUST 1 PAPER SHARE AND 1 RIBBON SHARE LEFT, CONTACT ME NOW TO RESERVE YOURS**
Ribbon shares all gone I'm afraid, message me if you would like me to organise another one...
Hello there,
How would you like ALL of the gorgeous Designer Series Papers in the catalogue** without having to buy all the packs of papers (totalling nearly £100!)
{See them on pages 97-99}
Yep, me too! So I have decided to do a paper share.
60 sheets of 6"x6" double sided papers, that's a quarter of a sheet of each of the papers in the new catalogue for just £12.50 collected or £14 posted out to you.
The papers are not really shown to their best in the catalogue but they are all really gorgeous in real life :-) You should be able to click on the picture to see them closer, remember though that just one of the sides are shown here, the other side is equally as yummy ;-)
**(this share does NOT include the speciality or the Paper Stacks) 
and I have also got an In Colour Ribbon Share for you too.
One Metre of each of the 5 new colour ruffle ribbons for just £5 collected or £6 posted.
These are really gorgeous ribbons too, I can highly recommend them :-)
If you would like either or both of these shares then please email me now to reserve yours now!
If you would like to view the fab new products in the catalogue then please see HERE
I look forward to hearing from you soon
Stampin' Hugs, 

Another Harry is 7!

As I mentioned yesterday Zack had another birthday party to go to on Sunday, and yes this boy was called Harry too! Pouplar name 7 years ago it would seem ;-) Anyway this was a football party and so I was inspired by an invite in the current catalogue (on page 46)
I used an England inspired colour combo of Real Red and Night of Navy to make this card
Clear heat embossed footballs decorate the bottom half of the card
Sentiment is from Party This Way again, such a versatile set this
a ribbon is tied around the card to hold it together and knotted through the eyelet along with a piece of real red 3mm taffeta
The Top Note die was used to create the insert,
and finally a little stand is adhered to the back so it can stand
O.K. I will be doing a mini tutorial with measurements for you as soon as I get some time this week,
Before I go this is your last chance to book onto Decembers Christmas Party class where we will be making this gorgeous banner, along with a free raffle each day this class runs, a Christmas present from me, mince pies and loads of fun guaranteed! I have added Thursday 15th December to the dates due to popular demand, message me now to reserve your spot!!
So, thanks for stopping by today,
Back tomorrow with some more convention shares,
Stampin' Hugs for today,

Monday, 28 November 2011

Harry is 7!

Super quick post as I am just off out to work, Zack had two parties this weekend for two boys both called Harry! This was the card I made for the first party on Saturday.
I used Party This Way stamp set, a great all rounder!
In a colour combo I don't really use a lot thanks for the idea Sally Ann! Pumpkin Pie and Lucky Limeade with a hint of Bashful Blue, I stamped and cut out the balloons and then punched a section with "7" on it and added crystal effects
I embossed the sentiment panel with the Perfect Polka Dots folder
and the party this way stamp was used for the background
and inside to finish
Well, must dash, back tomorrow, hopefully a bit earlier though!
Stampin' Hugs for today,

Sunday, 27 November 2011

Happy Birthday Evelyn!

Good Morning
Today is my good friend Evelyns birthday, Evelyn is a SU! demo in the Jems team too and I was lucky enough to spend a fair bit of time with her during convention and as we were both going home late on the Sunday we also spent an extra day in Disneyland Paris too, great!
Here she is overlooking the castle
what a fab day we had! So anyway, I made her a card using the gorgeous Pool Party with a touch of Calypso Coral and Basic grey, LOVE this colour combo from the Domestic Goddess DSP!!
I also stamped the coffee stirrer stems using tiny tags but they did run a touch after I had adhered them, doh!
I made the little pin wheels with the square punches from SU!, adding a flower brad in the centre of one (pic came out blurry so I dumped it!) and 1/2" DSP circles topped with crystal effects in the centres of the other two,
I used the scallop edge punch along the bottom and then used the mat pack and paper piercer to embellish this,
Yummy embossing frame was used here, it fits the large oval punch inside ;-) and the sentiment is from Perfect Punches which I inked using markers
Inside was stamped with Confetti in Pool Party along with the front of the card where I used versamark with this stamp, IYKWIM!
and finally, if you are still with me, an arty angle to finish :-D
Thanks for hanging in there, it is a bit picture heavy, I know!
Zack is off to a party today and I have more prep to do for the res of this weeks classes so I am off,
Thanks for stopping by today,
Stampin' Hugs,
Related Posts Plugin for WordPress, Blogger...