Showing posts with label Pink. Show all posts

Monday, 21 January 2019

Buffalo Check with Signs Of Santa for a Non-Festive card!

Hello there,
Today I have a card which uses some Christmas stash for a non-Christmas card!
The background Buffalo Check stamp is on the carryover list so is still available but the Mrs Clause from Signs of Santa is retired now. Did you get this set? I love her sweet expression and think that in pink she looks just adorable and not at all festive, let's have a look...
 I do love this buffalo check stamp, I used it with Blushing Bride here, layered with a fine edge of black card.
 I coloured Mrs Clause with blends and as she has a holly sprig in her hair I added a punched flower to cover it which has the added bonus of adding a little dimension too!
I also think she'd look fabulous like this on tags for homemade jams etc..
 Finished with a chalkboard tag which was also a Christmas set and some sequins (of course) ;-)
So, that's all for today, I'll be back on Wednesday with a new challenge from Inspire. Create, so please do stop by for that!
Thanks for looking today :-)
  Shop Online With ME!
  Host code for January spends over £25 and under £150 is UFQDSB72
Stampin' Hugs,
Products Used to create this project:


Friday, 19 January 2018

Pink Converse with Epic Celebration - A FREE Sale-a-Bration Stamp Set

Hello there,
Today's fun card uses the awesome Epic Celebration (FREE SaB) samp set! This is a fantastic set for those tricky males/teens but, as you'll see here, it is also awesome for a more feminine card too, see...
 I stamped the converse trainers with memento ink onto thick white card then coloured them with Pink Pirouette ink and a touch of smoky slate using a blender pen.
 I heat embossed the sentiment in silver (from the same set) and die cut it using the smallest stitched edge framelits before rolling it through the same pink pirouette ink pad to give it a little pop without adding lots of layers :-)
 Of course I topped the shoes with a swish of clear wink of stella glitter! *heart eyes* and finished the card by adding the front panel onto a basic grey card base leaving just a 2.5mm border either side.
OK, that's all from me for today, I'll be back tomorrow with another card.
'till then, happy samping!
 Shop Online With Me
Stampin' hugs,

Tuesday, 5 July 2016

TMT: Attach Twine Under Closely Layered Framelits - A Video Tutorial and a Card!

Hello there, 
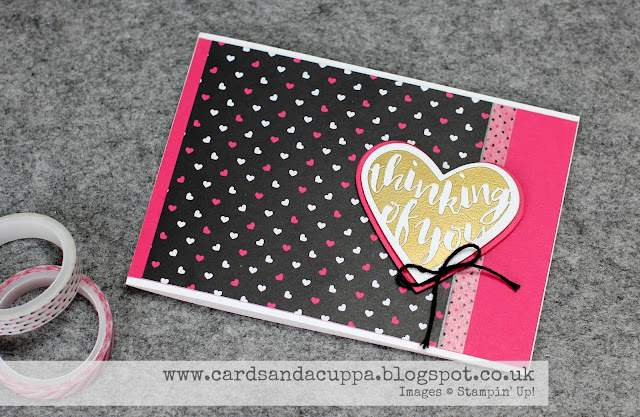
I have another sweet card today using the Pop Of Paradise stamps. We made this at class last month and here I have teamed it with the Sweet and Sassy heart shaped dies, some Pop Of Pink DSP and a little of the matching washi to make this card...
 I heat embossed this heart shaped sentiment using gold embossing powder before die cutting and then layering onto Melon Mambo card. I think heat embossing is one of my favourite techniques! What's yours?
 See how I added the new black bakers twine to the very edge of the heart layers? I was worried that it would come off if we secured it just with a glue dot so I had a fiddle and then decided to make a super quick video (less than 3 and a half minutes long!) to share with you how I attached the twine...
so, here it is!
 And here's the extra heart I made in the video, I just need to add this to a card now ;-) Pretty cute though, right?
and one last photo of the original card to finish today.
Well, I hope you enjoyed todays post with it's little video too?
And please, do let me know if there's something in particular you'd like me to cover in a video!
'Till tomorrow, happy stamping!
 Shop Online With Me
Please don't use this code on orders over £150 as you will be the lucky hostess!
Products Used to create this project:
Coming soon :-)

Saturday, 25 June 2016

A Fun and Easy Card with Pink Pineapples using Pop Of Paradise by Stampin' Up!

Good morning and a very happy Saturday to you,
Today I have another card from class last week where we used the Pop Of Paradise stamps and the super gorgeous pineapple from the set to make this card...
 I started by heat embossing the first pineapple in gold - super shiny!
Then used the same technique as I did in THIS VIDEO to make the Melon Mambo and Wild Wasabi pineapples either side. Aren't they cute in pink and green?
Sentiment is from Party With Cake, the punches are both retired but you could use the new Classic Label instead :-)
I used the 1/16" handheld punch to make two notches for the twine to rest in, a great way to stop the twine slipping down the card.
 and one final photo for today :-)
Well, that's all from me for today, we are off to see FiL today but I'm off tonight so I may even get a little craft time in! Who knows? ;-)
Thanks for looking today!
 Shop Online With Me

Remember orders over £250 get an extra £25 in rewards in June! 
Don't use this code on orders over £150 though as you will be the lucky hostess!

Related Posts Plugin for WordPress, Blogger...