Wednesday, 11 April 2012

Stampin' Up! Create a Cupcake with a stand tutorial

Hello there,
I spent a lovely day with Zoe in town yesterday, hence my lack of a post. It was her birthday a couple of weeks ago and she loves clothes and shopping...so that's what we did, all day! She got herself some lovely clothes and we had a fab "Girly Shopping Day" together.
Anyway, back to the card I have today. I used the lovely create a cupcake stamp set and punch to make this card, but I wanted a stand for it to sit on so I played with my punches and came up with this
 I did the sprinkle of glitter technique on the cherry with Crystal Effects like I did on Zoe's card last week
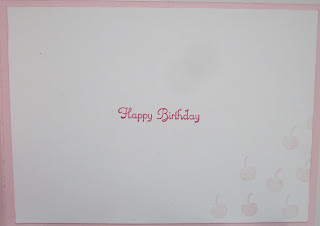
 Inside this sentiment is also in the cupcake stamp set
 and this is how I made the little stand, Tab punch, Large Oval and Scallop Oval punches
Remember this stamp set and matching punch will be gone at the end of the month, possibly not to return, who knows??
Email me if you would like to order this or anything else from either catalogues, remember there is also the free paper offer running during April too :-)
Stampin' Hugs from me today

Monday, 9 April 2012

Stampin' Up! Borderlines...going soon!

Hello there,
Grotty weather here today, typical bank holiday don't you think?? ;-)
Anyway, I have a card that will cheer you up I'm sure! I have been seeing lots of rainbows around of late, so I decided to make a Rainbow card with the lovely Borderlines stamps, REMEMBER this set will NOT be available after the 30th April when the Spring Mini ends!! Gutted!
So, I stamped the floral line in rainbow colours and then cut it out using the Top Note die
 adding clouds using the Cupcake punch! ((Another item not available after the 30th April)) I  inked the edges with Baja Breeze and embossed with .... a sneak peek from the Summer Mini ;-)
 arty angle
 and a touch of stamping and embossing inside to finish
I have to admit to loving this card (can you say that about your own cards???) It just feels very summery and I am soooo ready for some sun right now!
Well, I hope you enjoy the rest of the bank holiday whatever you are up to
Stampin' Hugs,

Saturday, 7 April 2012

Stampin' Up Boxelope Tutorial

Hello,
**EDIT TO SAY I HAVE NOW MADE A VIDEO TUTORIAL - WHICH CAN BE FOUND HERE - USING THE DIAGONAL PLATE AND ENVELOPE PUNCH BOARD MAKING THIS BOXELOPE EVEN EASIER TO MAKE**
As promised I have an update to my Boxelope tutorial I made a while ago. In this tutorial I will share how you can make a Boxelope for a 6"x6" square card, to any depth, from just one sheet of 12"x12" card.
All you need is a bone folder/scoring tool, pencil, ruler and adhesive.
**Mark all lines lightly so they are easy to erase at the end**
Start by measuring and marking at 6" along each side
 draw a line (faintly) in at these points to approx 4" into the centre
 place your card on the 12x12 piece lining the corners to the lines
 mark where the corners are
 and join these together
 measure the depth of your card and mark behind where your card sits
 mark this depth all around the original lines
 and join these up too, now score along each line
cut out the corners leaving a square in each one, just cutting to make a tab as shown 
 this is what you should have now, erase all pencil lines now
 glue the tabs, one at a time and fold up to make the box base
your card should now sit in it like so 
 and secure as desired, I tied this on the flat side using satin ribbon...
 but this one was secured with Velcro Dots on the tabbed side and topped with a little flower :-)
Well, that's it from me today. I hope this is a help to you  sending your special, thicker cards :-)
Stampin' Hugs from me today,

Friday, 6 April 2012

Stampin' Up Bigz Numbers

Hello there,
Last week was our Zoe's birthday (we call her Flo ;-)) and so I made quite a simple card that matched the frame I made for her a while ago, I actually wasn't even going to make a card, I was going to use the frame as the card and write on the back! Anyway, this is what I ended up making her...
 using the fab Bigz Number dies I recently got from Jules for promoting, Thanks Jules :-))))))
I covered the writing in Crystal Effects and sprinkled glitter into it from about 8inches to get this softer look than if you cover it with Dazzling Diamonds
 and of course, Just Perfect alphabet with Pennant Parade to make this bunting
and this was the frame to match, I made this ages ago and had to keep it hidden from her!
So, as I made Jules' card the other day I realised that my boxelope tutorial is not very clear! So as I made Zoe's card I re-photographed it and will be back tomorrow with an up-dated version for you :-D
Thanks for stopping by today
Stampin' Hugs,

Wednesday, 4 April 2012

Stampin' Up! Button Buddies Class

Hello!
My next class runs on the 14th, 16th, 17th and 18th April and we are going to be using Button Buddies to make these cute 3"x3" cards
 and a little handbag box which I made with the Scallop Envelope die from SU!
how about a closer look at all the cards then... ;-)
Rock and Roll Flower
Very Cherry
 Flower Vase
 and lil' piggy too
and they all fit in the box with their envies too
I have a couple of places left for this class, cost for this one is just £10 and FREE with an order over £35 placed at the time of the class, message me to join us for some fun and crafting
Thanks for stopping by today
Stampin' Hugs,

Monday, 2 April 2012

April Free Paper Offer!

No sooner has Sale-a-Bration finished than Stampin' Up! have another fantastic offer for you!
During the whole of April SU! have a Springtime gift for you :-)
If you spend £45 or more during April then you can choose from a selection of Designer Series Paper packs for FREE (limit one per qualifying order)
 Click on THIS LINK to see the papers more closely

The FREE papers are as follows
122350 Berry Blossom Designer Series Paper (find in Spring mini)
122342 Beyond the Garden Designer Series Paper (in Spring mini)
122347 Nursery Nest Designer Series Paper (in Main Idea Book)
122354 Pocketful of Posies Designer Series Paper (in Main Catty)
And if you would like to place an order, please email me today for a chat


Last shout out for Stampers 6 too!! get SU! goodies every month and be the hostess one of those too :-)
Stampin' Hugs from me today
Sunday, 1 April 2012

A Special Card with a Broadsheet Alphabet and How to Punch An Image Larger Than Your Punch Tutorial

Hello there,
I am here today with a special card for a special friend, Jules. She is my SU! Upline but has become so much more than that, she is a real friend to me. Anyway, Jules made Gold 1 in promotions last week and so I had to make her a card to show her how I was thinking of her and how proud I was too!
Of course it needed Gold in there somewhere and what better colour to go with Gold but Calypso Coral! The perfect colour combo.
 Ribbon rose with Blossom Party die and a pearl
a lovely Butterfly embosslit with pearl body
 and a little decoration inside too :-)
 Now, Jules called me yesterday to ask how I made the "G" and "R" overhang the postage stamp punch so I made a super quick tutorial on how it's done for you all! This method would of course work with any stamp and punch combo where the image is slightly larger than the punch ;-)
Begin by stamping your letter (lower down the card would have been better, but we can work around this ;-) Also punch another postage stamp out too from scrap card.
 position the extra punched square over the top of the letter, I had the letter slightly to the left so the loop at the bottom fitted in the square's edges, and mark lightly with a pencil
 trim around the bottom of the letter, up to the lines you just marked, I also cut off some of the bottom pieces where I stamped too high at this point
 use your scissors to feed the extra part of the image that will be outside the punched area
 like so, and then just punch
 rub out your pencil lines and tidy up your cutting if needed
OK, that's me for today, I hope you like the card and that my mini tutorial has been a help, any questions, please email me :-)
Stampin' Hugs,
Related Posts Plugin for WordPress, Blogger...