Showing posts with label Boys Will Be Boys. Show all posts

Sunday, 8 May 2016

Using Stampin' Up's Boys Will Be Boys. A Whole Weekend of Fun! Day Two.

Hello,
If you were here yesterday you would have seen I made a couple of cards using my favourite retiring stamp set Boys Will Be Boys. I made them for my part in yesterday's Jems "retiring products" blog hop. Did you hop here yesterday? If so, I hope you also enjoyed hopping around to see the other favourites of the lovely ladies in the Jems team? 
If you missed yesterday's post you can find it HERE.
So, when I was making the cards for the hop I got a tad carried away and ended up making four cards so I thought I'd save these two to share with you today :-) Take a look...
I'll start with the Robot card.
 So, I really wanted to use this stamp for something other than kids birthdays! I was going to give this to my hubby for our anniversary but I was so excited by it that I showed him, by accident! Doh!
Sentiment is from Words of Truth, love the typewriter font and the kind, encouraging words of this set and I used Chalk Lines (sold out) again for the hearts in the background.
I heat embossed this fella in silver for this card, heat embossing makes the colouring much easier ;-). I do love to watercolour this little robot but I always seem to end up colouring him using Smoky Slate - I suppose if it ain't broke....
And a top view to finish. I think this is my favourite of the four....
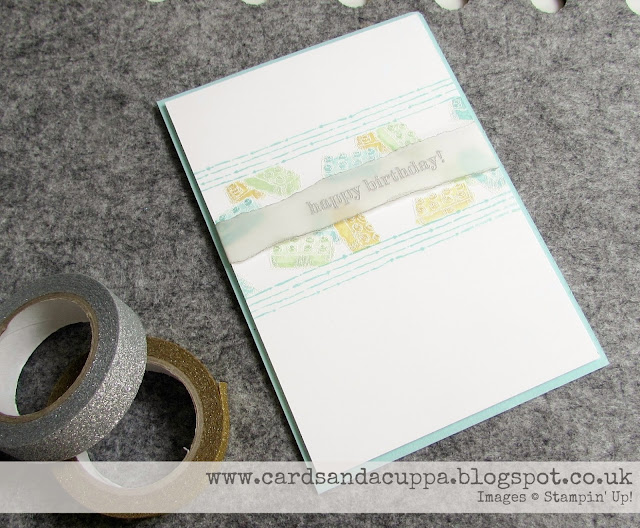
And similar to yesterdays Lego card I masked, stamped and heat embossed the Lego, except this time I masked the outer edges instead of across the middle. Then I coloured this one for a little boy in Pool Party, So Saffron and Mint Macaron.
 I like to use SU! thick white card to stamp, then colour all the Boys will Be Boys images.
I'm no artist and my colouring skills are basic at best, but you can find a simple VIDEO HERE on how I watercolour them, if you'd like :-)
More Chalk Lines stamps frame around the edges of the Lego and I stamped the sentiment onto vellum and heat embossed it in silver before tearing it.
Unfortunately found it didn't show up very well on it's own so my TIP: is use a little Smoky Slate ink and a sponge on the reverse of the vellum, this just makes the sentiment stand out a bit better :-)
and one more look at this card.
If you would like to see the other two cards in this series from yesterday, you can pop back HERE.
To see all the cards I have made using the Boys Will Be Boys stamps please click HERE, scroll and click "Older Posts" to see them all.
And here all four of this weekends makes together, to finish today :-)
Thanks so much for looking today, I'll be back tomorrow with something new!
'Till then,
Stampin' Hugs,
 Shop Online With Me
Products Used to create this project:


Saturday, 7 May 2016

Saying Goodbye With A Double Dose of Boys Will Be Boys by SU! Part of the New Jems Monthly Blog Hop :-)

Hello there,
Today I am taking part in the first of the new Jems Monthly Blog Hop. You should have hopped here from seeing Sharon's lovely creations, you can hop back there if you like or continue around the loop until you get back here :-) and for a full list of all the blogs in this group you can go HERE.
We will be having a regular hop on the first Saturday of every month, each month will have a different theme and we will be sharing lots of SU! fun and inspiration with you all. All you need to do is pop to any of the participants, view their lovely creations and then click 'next' at the end of each post to visit the next blog. 
I hope you enjoy this months hop, the theme, perhaps unsurprisingly is "Retiring Products".
And I have chosen my favourite retiring stamps Boys Will Be Boys to make two cards for this hop, please take a look....
Lets look at the parachute army man card first.
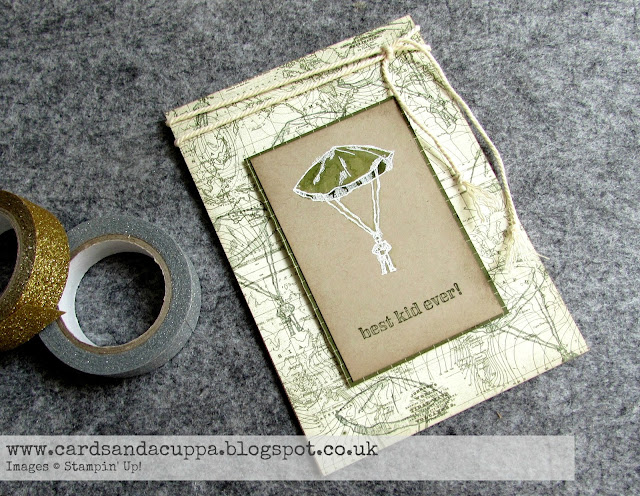
I stamped the parachute man onto the background paper from the Going Places DSP stack, this map paper is perfect, right? Then I tied the thick twine around the card and knotted the ends in (what I think may be) a parachute rope style? ;-) The main image was stamped and heat embossed for easy colouring onto crumb cake card.
My youngest loved this card, said he wants it for his birthday, result!
 And a closer look at the girly Lego card too.
I masked a strip across the centre of this card before stamping and heat embossing the lego pieces either side. After colouring the lego in using Melon Mambo, Mint Macaron and Wisteria Wonder ink pads and my aqua painter I stamped the wavy strip from the Chalk Lines stamps (which have now sold out) between the images, topping it with a sentiment on some torn vellum.
Links to the main products I have used (that haven't sold out!) are at the end of this post. 
Well I really hope you've enjoyed these two cards from me today? I have two more for you tomorrow using this set so please don't forget to come back then but now you are off to visit the very talented Julie....
Happy Hopping!
 
For a list of all blogs participating you can go HERE :-)
 Stampin' Hugs,
 Shop Online With Me
Products Used to create this project:


Wednesday, 13 April 2016

Emboss Resist Watercolour Wash with Lego from Stampin' Up's Boys Will Be Boys Stamps

Hello!
If you follow me on Instagram you may have seen that I shared this picture a couple of days ago with a sneak peek at an emboss resist watercolour panel before I made it into a card and all the yummy colours I used? I share a lot of my "on the go" makes there as well as a little peek into what I'm doing between blogging so if you are an Instagram user I'd love to see you over there too :-)
Anyway, here's the finished card I made from that watercolour panel using the lego stamp from Boys Will Be Boys for a girly card...
 So I started with watercolour paper, stamping a few of the legos using Versamark then heat embossing in white, I then stamped a couple more and repeated until it was covered.
TIP: It's a good idea to stamp and heat emboss in stages like this as the Versamark is very hard to see on white.
I then chose four colours and washed the legos using an aqua painter and ink pads (all supplies links are at the end of this post), concentrating the colours on the bricks and washing it outward towards the next image.
It's a very easy and forgiving technique, this ;-)
 I added a sentiment on a little hand trimmed banner from the Party With Cake stamp set. Love this typewriter font!
 Adding a little bakers twine down the side...
And a few rhinestones to finish off.
 and one more picture to finish today :-)
Okie Dokie, I have a ton of writing up to do today for a commission so I had better crack on!
 Thanks so much for looking today, 
Stampin' Hugs,
 Shop Online With Me
Products Used to create this project:


Related Posts Plugin for WordPress, Blogger...