Showing posts with label Warmth and Wonder. Show all posts

Friday, 6 December 2013

Washi Tape (is not just for cards!) and the Warmth and Wonder Stamp Set

Hello there!
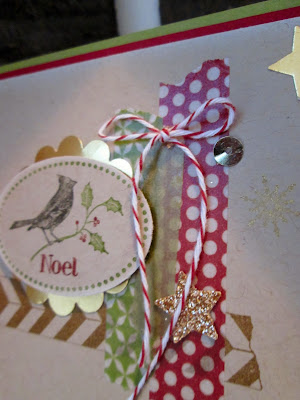
Today's card is very much a layered card. I used a combination of the Tape It stamp set, Season of Style Washi tape, some sneak peek Gold Washi Tape, more sneak peek gold sequins ;-) and some of the very lovely Gold Foil Sheets which I punched out into little stars
Tons of sneak peeks on this card today!! All combined to make this...
 I added a Bunny Ear bow (see the "how to" video HERE) using Bakers Twine and a Champagne Glimmer Paper star too..
 Stamped Gold snowflakes and the Noel Sentiment are from the {very well used this year} Warmth and Wonder stamp set
 and finally a look at one of the many other uses for Washi Tape!! My tax disc holder simply refused to stay on the car window last week!!! So, out came the Washi tape! 
See, it's not just for cards you know ;-)))) ha ha ha!!!
OK, I'm off to work again,
Back tomorrow with another card and another mini tutorial for you :-D
Stampin' Hugs for today,
 

Wednesday, 13 November 2013

5 Cards with the Circles Thinlits. FREE Full Tutorials with my top tips included!

Hello,
I am here today with the tutorial I promised you. I wanted to get full value for money with this die set and so came up with several ways to use the Circles Thinlits dies to make both flip cards an easel style and a gift card holder as well, but just so you know this is a l-o-n-g post, so please, grab a cuppa and enjoy! ;-)
Please note: This tutorial is in a mixture of centimetres and inches 
*Please, click on any picture to see it larger*
My first TOP TIP for you is: use relatively new cutting plates ie: ones without too many lines in them as you will be seeing both sides of the card once folded,
Cards 1 & 2
Now, onto cutting: you can get 2 standard cards from one sheet of A4 card, simply cut it in half at 14.8cm, and die cut each piece like so, you have a small-ish band of waste at the bottom but it's a usable sized piece so it's not all bad ;-)
 This will give you cards like these, to get the flipped circle at the bottom of your card simply turn over the die cut shape and work with the "rear", folding accordingly 
1.2.
 Now, to make your paper fit around the flip area simply cut to size and run through with the die again.
The paper will be 13.3cm high by (L-R) 5cm and 7cm wide.

TOP TIP: Make sure you butt the inside edges up to the very edge of the die. Also make sure your patterns match and are the same way up. 


Also ensure that both pieces are at the same height with an even border all around before you cut, remember there is no moving the paper around on the card front once you have cut!
 Now, lets make this die really work for it's money!!
Card 3
First we have a tri-fold card. No I didn't "invent" this myself, there are quite a few  tons of other tutorials out there on the www, but I have tweaked all these measurements 'till I found the easiest way I thought was possible!!
So, the measurements you need for this are 8.5 inches x 5+7/16 inch. Now, I know a lot of other tutorials say 5+1/2" but I found I struggled to get the card to slot in the die at this width so I trimmed a bit away, then a bit more 'till I took a whole 1/16" away, this way the edges don't snag and look untidy (bad) and it fits through the die like a dream (good!) ;-)))
TOP TIP: I know it seems obvious but remember to keep the bottom of the card over the top of the die, I can't tell you how many times I forgot and cut the bottom section away too when I was practising!
Feed the card up from the front and bottom to make this easier and also there is less chance of chopping the bottom off too!
 and this makes this card. Trim the first two panels of DSP with the die as before with the last section (whole piece) the measuring 13.3cm x 6cm wide, (panel widths L-R: 5cm, 7cm and 6cm)
3.
Card 4
And now, even more value for money an easel card too! 
This idea is all my own. I designed it for my class as I wanted to share how many ways this die can be used, please remember to link back here if you use or blog this idea, thank-you for your understanding.
4.
 
So, the dimensions are the same as before (5+7/16" x 8.5"), slide in from the bottom 'till the card is butted up to the top edge 
<<<<< (this picture showing the rear of die)

the front just showing where you have just the smallest circle section showing like so....
Remember to leave the bottom section over top of the die!
Again, feed the card up from the front and bottom to make this easier
this is what you will get, reinforce the folds inwards with a bone folder, 
the only section actually cut should be the smallest half circle
and the panels for this card measure 13.3cm x 8.5cm for the top piece and 13.3cm x 6cm for the inside.
Die cut the larger piece making sure the side and bottom edges are even again and the card or paper is just at the top of the small circle.
This should be what you have once cut
 the sides of the circle will only be scored, you need to trim away along the score lines
 to end up with this, decorate as you like now
The top piece butts right up along the folded edge with a small 5mm gap around the sides and bottom, the bottom section has a 5mm gap all around, I will post more pics on this tomorrow ;-)
Card 5
So, finally for today I have a Gift Card Holder too!! 
This is also my own design and I would love for you to use it I just again I ask if you do use this tutorial that you link back to me on this blog, thanks again :-)
5.


The measurements to make this Gift Card Holder are as follows: 
7+1/2" x 5+7/16"
<<<<<< Die cut the same as Easel card

To get this.... which is just the same as before but with a shorter end, reinforce score lines with your bone folder

 Repeat the die cutting for the top section from the easel card (13.3cm x 8.5cm) and cut a piece 13.3cm x 3.8cm for the inside, decorate each piece (or use DSP for speed ;-))
 add tape to each end of the inside small flap to hold the gift card
to make this pocket, add the decorated the small white card to the front of the pocket. You could also add a message here if desired :-)
 Side view of the Holder
 secure closed with a ribbon bow (or knot for a male)
Phew!!! That was one almighty post!! My thanks for sticking with me!
If this post has you wanting this fabulous and versatile die (and who wouldn't!?) then please do visit it at my shop HERE
I really hope that today's tutorial is useful to you and I look forward to seeing your creations too :-)
Thanks for visiting,
Stampin' Hugs,
 

Tuesday, 12 November 2013

Circles Thinlits Flip card using Warmth and Wonder

Hello there,
Today I have another card using the Circles Thinlits (LOVING this die set right now) and the cute Warmth and Wonder stamp set, this is a hostess only set but YOU can be a hostess without the hassle of a workshop in my new Virtual hostess Club starting this month, SEE HERE for more details :-) and then EMAIL ME to join in :-)))
I actually sent one of these kits out as this months card club kit, one kit per position is included with each months order in the club... 
(contained no stamped images) Paper is the Season's of Style pack
 and this is the card I made with the kit :-)))) I added some of the lovely new punched Chevrons to decorate the front
 Sentiment is from the stamp set too along with the little snowflake which I stamped using Gold Ink
 You can really see the sparkle of the ink here, the white circle was made with the 2+1/2" circle punch. It fits on the flip part perfectly but you do also get a lovely scalloped circle included in with the die.
 and here they are together...
OK As you may know I did a whole class on this Circle flip card die this week and so I have a few tutorials and top tips to share with you. 
I will be posting this tomorrow!!! So please do pop back and have a look :-)
Thanks for visiting today and I hope you come back for a visit to see the tutorials,
Stampin' Hugs,
 

Monday, 4 November 2013

Washi Snowflakes

Hi there,
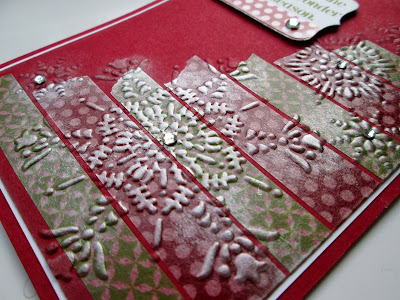
I have a sweet and simple card for you today using the Season of Style Washi Tape and the Northern Flurries Embossing Folder.  It's another one that could be made quickly and easily in multiples :-)
 I simply added strips of the tape and ran it through the Big Shot. I found that the snowflakes were a bit lost on the tape so I highlighted them using my Silver Ink pad and a sponge and added some Rhinestones to finish the centres :-)
 The sentiment is from Warmth and Wonder Hostess set
I added the strip of Washi tape after stamping then die cut it out using the Chalk Talk Framelits
OK, I hope you liked today's card,
Thanks for looking today,
Stampin' Hugs,
 

Sunday, 13 October 2013

Mrs Clause Dress Up Tag with FREE TUTORIAL

Hello there,
Back to Christmas again today! I wanted to give the ladies coming to my all day Christmas Kick Start class a bag with their papers, ribbons and gems etc in but it also had to be big enough to take all their hand made cards home in.
**Please Scroll Down for the Mrs Clause Dress Tutorial**
 I found these lovely paper bags but of course I had to decorate them so I turned to my Big Shot with the ever useful Top Note die and Dress Up framelits too...
So, the ladies who chose red a their colour scheme had this tag on their bags, the bottom half of the Crumb Cake die cut is decorated with more of the Season's of Style paper, and of course Mrs Claus' dress which I made in Real Red
 I used the new Gold Ink pad with the snowflake from the Hostess set Warmth and Wonder to decorate the top section, message me to find out how you can get your own hostess exclusive Warmth and Wonder stamp set ;-)
 and the "Blue Ladies" had this bag tag, I used Winter Frost Paper at the bottom of these Whisper White tags with the new Silver ink using the same snowflake from Warmth and Wonder
 I made Night of Navy Mrs Clause dresses for the blue bags ;-)
 and a few of the blue bags together,
 So, these are the dresses and I tried a couple of ways but this method was by far the quickest and most effective way of  making these dresses easily. 
 So, in addition to the Dress Up framelits you need this; the 1+1/4" scallop circle punch
Also making these dresses was made a lot easier with the Magnetic Platform as it significantly reduced "slippage" making multiples much easier; although, of course, it's not essential.
 Punch from white card a scallop circle, you don't need the whole thing, just leave off the bottom 5 scallops when you punch
 then (and you can do two (or three max) at at time with the Magnetic Platform but I would suggest just one layer at a time without it) die cut the sweetheart neckline from scallop circles like so, making sure the point is in the centre of the scallop at the bottom,
Adhere to your already die cut dress and decorate with 3mm Taffeta ribbon (I used Silver and  Black)and a small flower in the centre of the "belt" from the Punch Pack
*Remember, you can click on any of the pictures if you want to make them larger*


{I did try to add the punched shape whole and trim from the back but as the collar of the dress comes in at the top it was not only tricky but wasn't as neat as this and definitely took longer, it can be done but I wouldn't recommend it ;-)}


Well, I hope you have enjoyed today's post as much as I did making these little Mrs Clause dresses?
Thanks for stopping by and remember to link back here if you make some of your own, I would love to see yours too :-)
Stampin' hugs,
 
Related Posts Plugin for WordPress, Blogger...