Showing posts with label Mini Treat Bag Thinlits. Show all posts

Saturday, 11 July 2015

Day Two of Five Days of You're Sublime by Stampin' Up! Paper Piecing on Two Projects with a TOP TIPS!

Hello,
and welcome to day two of Five Days of You're Sublime!
I have a double treat for you today with two (matching) projects and a few Top Tips too!! 
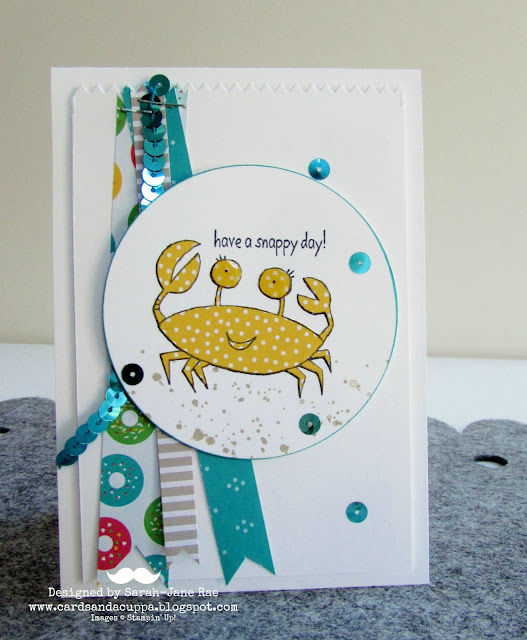
I made a sweet card and a matching Treat Bag using the Thinlits die with this cute crab from You're Sublime. I thought it would be perfect for paper piecing with the Cherry on Top DSP stack, a technique I haven't done in an age! So lets take a look...
I'm going to start with a closer look at the card first :-)
When I saw this crab I thought it was perfect for piecing!
To paper piece (any image) all you do is stamp the image (I used Staz on so it didn't "bleed" when I added the Crystal Effects) onto thick white card then again onto the paper you want to use, trim around the image on the paper, ensuring you cut along the lines not leaving any border (like I usually do), then glue over the image stamped onto white card. Please Note: Before I added the patterned paper to this image I stamped a Gorgeous Grunge sandy floor using Sahara Sand ink. 
But I have to admit this crabby girl was a bit fiddly to cut so.... 
 This is my first tip for you today! I'm right handed so I started cutting on the right hand side in an anticlockwise direction so I had a large solid piece to hold onto as I cut the thin claws and eyes. I *think* if you are left handed you would just start on the left hand side and work clockwise for the same effect. Lefties: Let me know if that works well please!
I then die cut the whole image using the circles framelits adding a marker border to make it pop.
Secret Tip: shhh.... keep an eye out on Tuesday for my TMT Video with tips on inking edges... *wink*
Tip Two: To give the mat on your card a pinking edge to match your Treat Bag: Trim your card to 9.3cm wide (3+5/8") and use the top edge of the largest side of the treat bag die to trim the top edge only.
Tip Three: I glued the banners together and again used the top edge of the treat bag die to cut them so they would sit perfectly on the card (I  also did this on the treat bag) Then I stapled them, and the sequins, to the front.
Finish by adding the image panel, using dimensionals, to the card front and adding Crystal Effects to her eyes and add a few sequins to complete. Leave flat to dry.
 So, onto the Treat Bag Die Cut. This die is still as popular as ever!
This treat bag was cut from Thick Whisper White card. The only difference in the decoration on this treat bag was that I cut the crab image out using a smaller sized circle framelit and the banners are slightly shorter to accommodate the smaller size of the treat bag.
 and together again to finish today :-)
I really hope you have enjoyed this combo today as much as I did making it? 
Thanks for stopping by today and remember to come back tomorrow for another card using this set!
Stampin' Hugs,
Products Used to create this project:

Sunday, 3 May 2015

Five Days of Stampin' Up! Note Cards; Day Three. Using Treat Bag Thinlits.

Happy Sunday!
I had a day off from the blog yesterday as it was our 19 year wedding anniversary! We didn't do anything as such, just spent the day being together ;-)
Anyway, today I have the third card in this Note Card series to share with you. And HERE is the link to the box I made to fit these note cards into, in case you missed it. 
The Mini Treat Bag Thinlits (you can also see my Three Ways with Treat Bag Thinlits VIDEO) make a bag that fit these note cards in perfectly so I decided to use some of the Birthday Bash DSP and make a matching card to pop in it and use as an envelope - and it's a fab way to use up those retired paper packs you have! See....
 After stamping the note card using the Perpetual Birthday Stamp set we added the die cut word (included in the treat bag thinlits set) and a few punched Dazzling Diamonds glimmer paper stars


 A little close up of the treat bag with the note card inside


I like making note cards to match DSP ;-)
And a top view to finish today.
All the cards in this series are nice and flat for posting or popping in with other bits without adding bulk. 
To see the full five days PLEASE CLICK HERE (all 5 posts will show up here after the 5th May)
Thanks, as ever, for looking today, I hope you are enjoying this mini series?
Stampin' Hugs,

Friday, 6 March 2015

Using Stampin' Up's Treat Bag Thinlits to match a Card in a Box

Hi there,
Today I have the little table favours I made for my eldest sons 18th birthday dinner last week. They match yesterdays card in a box which you can find HERE :-)
I am still loving the mini treat bag thinlits die and for this project I kept the bags flat -as they were intended- as I filled them with a lottery scratch card and a mini Green and Blacks chocolate. You can of course see my video HERE for three ways with this die including how to make it 3d.
**EDIT TO SAY: I have a new Two Minute Tuesday Video sharing my tips on how to make sure the sequins don't unravel HERE**
OK, so onto today's treat bags,
  I used retired paper to match yesterdays card but wouldn't they look fab in Birthday Bash paper??
On a punched Note Tag I stamped and then masked off the "celebrate" word from  the Celebrate Today stamp set then stamped these waves of triangles (they are intended to be balloon tails, I think) in different colours to coordinate with the paper
 Some of the bags together. 
I love the Bermuda Bay sequins teamed with the Tangerine Two Tone trim
 On the table I added coordinating serviettes too ;-)
 I also needed an extra bag to use to wrap a gift. I simply changed up the tag using the "surprise" sentiment from the Birthday Surprise stamp set to match the card...
 ...and added the stars and bursts from Perpetual birthday Calendar around the edges
and a few stacked together to finish. They went down well at the birthday meal but unfortunately we only had one £1 winner on the whole table ;-)
And here was the table on the night- there were a lot of those little star sprinkles found for days afterwards...
and a pic of the birthday boy with his card too!
OK, that's all from me for today.
I hope you have enjoyed today's post and I'll see you tomorrow, same time(ish), same place!
Thanks for looking
Stampin' hugs,
Products Used to create this project:
Related Posts Plugin for WordPress, Blogger...