Monday, 30 May 2011

Chris' Special Birthday

Happy Bank Holiday to you all today,
and a BIG Happy Birthday to Chris, my SU! sister, I have scheduled this post as I am again at Lyndhurst Community Centre for their Craft and Gift Fair, I would love if you stopped by and said Hi!
So, back to Chris, she has a very special birthday today, I am not sure I should say how many years young she is but here is her blog and if she tells you then that's up to her ;-)
I used Crumb Cake (again) over the base of Rose Red and teamed it with Wild Wasabi and Rose Red accents made with the super cute Baby Blossoms stamp set,
included in this set is also this lovely frame as well as all the 2 step stamps to give your flowers and leaves that little extra something, sentiment is the ole' faithful Sincere Salutations, 
I made my first double bow with Seam Binding ribbon (available in this SHARE) in crumb cake then topped it with a flower from my stash after I stamped the Top Note die cut with Versamark and Crumb Cake ink to make the background. 
Arty angle to see the depth, this was definitely a large letter for the postman! I really hope she has gotten it in time for her special day, 
One last pic of the inside to finish,
Well, that's all for today, Thanks for visiting me today, I hope you like this one. I was really happy with it, but more importantly I hope Chris likes it and has a wonderful birthday!
Stampin' Hugs,

Sunday, 29 May 2011

Happy Birthday Zoe!

Good Morning,
No, it isn't my Zoe's birthday again! but my friend Zoe who's little boy Ben is in Zack's class. Now I didn't quite realise 'till about 1.45 on Friday that today was her special day! eek! and so I turned to 2 challenges to make this card in something of a hurry!
The first challenge was a cute little sketch by Your Next Stamp Challenges and a colour challenge with Connie and Mary using Peach Parfait, Baja Breeze and Riding hood Red and I just loved this colour combo, it just seemed so fresh and summery. I started with a Crumb Cake base and stitched round the first layer once the dsp (from the level 1 hostess pack) was added, In Colour ribbon was used to tie the bow, it is so soft and easy to tie :-)
When I saw the colours I immediately thought of the Cheers to You stamps, plus I think Zoe would be rather partial to a cocktail (just don't mention the robot dancing ;-)) Lol!
I did change the scallop edge to around the side and I punched out a background using the Decorative Label Punch instead of an oval ((if it does not fit the sketch well enough, please feel free to discount my entry)) I also added a layer of crystal effects to the glass.
I also stitched inside too and added a bit of decoration for good measure with the sentiment from Curly Cute.
I hope she likes her card and has a wonderful birthday! Happy Birthday Zoe!
Thanks for dropping by today and Stampin' Hugs to you,

Saturday, 28 May 2011

Simply Stampin' Challenges, Week 8, "Floral Frenzy"

Good Morning to you,
And welcome to Week 8 of Simply Stampin' Challenges! I hope you will join us for this weeks challenge, a nice easy one as it is called "Floral Frenzy" So many options with this challenge and we would love to see your take on it. If you have no idea what I am on about then hop over to the challenge blog for more info and to see what the rest of the DT have made to inspire you this week :-D 
Now, the first stamp set that came to mind for me was the cute little set "A Flower For All Seasons" and if you have come from the Simply Stampin' blog you will have seen I decided to make a set of 4 cards each using a different stamp from the set.
I die cut, embossed and spritzed with shimmer paint a flower from the  Fun Flowers die to back each coloured and punched image,
If you haven't noticed this set in the catty, it is on page 53 of the main IB&C and at just £12.95 I think it is a little gem! and just perfect for colouring therapy ;-)

I teamed the spring image with daffodil delight card and ribbon with a so saffron button,


Summer is Melon Mambo card with Pretty in Pink ribbon and button, 


Autumn is Pumpkin Pie card and Old Olive ribbon with a Cajun Craze button,
And Cherry Cobbler with Basic Black for winter. Sentiment punched using the Modern Label XL punch.
I coloured all the images using ink pads and blender pens. The pens are great for the water coloured look but much more precise for smaller images. The sentiment is from Hello, You tucked away on page 86.
Well, I hope you have enjoyed today's project and if you want to see it in person then pop along to Lyndhurst Community Centre on Monday this week, and say Hi too!
Thanks for stopping by today, Stampin' Hugs, 

Thursday, 26 May 2011

Less is More Butterflies

Hello there,
I wanted to enter the Less is More challenge again this week not least as it really does push me out of my comfort zone ;-) the theme this week is butterfly(ies) and so I made a mini card, it is just 7cm square,
Crumb Cake base with a layer of Baja Breeze. I used the Beautiful Butterflies Die and cut out smallest butterfly twice which I then embossed with the Perfect Polka Dots embossing folder before sewing it onto the card front,
mat pack used to add a perfect straight line along the bottom as well as Tiny Tags stamp set with the matching Jewellery punch for the sentiment,
and a little decoration inside, this little butterfly is from Itty Bitty Bits,
Well, that's today's post for you, all supplies used here are SU! and available through me,
 I have got Zack's celebration of work at school this morning and a couple of cards to make later, I hope you too have a lovely day, whatever you are up to :-D
Thanks for stopping by today,
Stampin' Hugs,

Wednesday, 25 May 2011

WOYWW 103

Hello there!
I am back with another foray into the wonderful world that is What's on Your Workdesk Wednesday, hop over to Julias blog if you have been living in a box and haven't heard what all the fuss is about ;-)
Well mine is (as ever) piled high all around, this is to the left of where I sit, a pile of paperwork I need to fill in and file, book to look pot out from the craft fair I did the last two Sundays and notes and measurements for the Breast cancer charity class I am planning for July, pegged up infront of me so they can't got lost! Always tea and my mobile there too.
to the right is the (not in the correct place) pile of stamps I have been using this last week, however not for the last 3 days as I also had card classes Monday and Tuesday,
and further round to the right is a bench which has all the stuff I need for Bank Holiday Mondays fair in Lyndhurst, leaflets on classes, some cards I took but didn't have room to put out, New business cards and leaflets ;-), and a few homemade bits for sale in a cake stand, the rest is display items showing of Stampin' Up! products :-D
Well I am off for a look round to see what you lot have going on on your desks now, see you soon!
Stampin' Hugs,

Tuesday, 24 May 2011

Class Fun!

Hello!
I haven't got a project to show today I just wanted to share a couple of pics form this month's class! I totally forgot to take one today but this is from Monday's class.
A great time was had by all, the Father's Day project was very popular with all the attendees. You can see more details of the book we made HERE. All credit to Anna for this gorgeous brag book made with just 1 sheet of 12"x12" DSP!
We had a few different colour combos to mine too, Black and Old Olive was popular and so was Espresso with Vanilla or Old Olive.
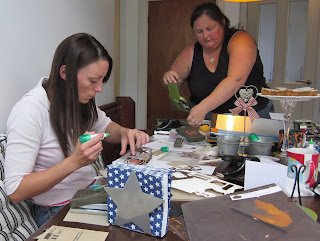
Here are the Monday ladies, smiling (or hiding!)
And hard at work..
always with cake too. and look on the left at my new star pupil! my sister Auntie Amber, (everyone calls her this!) it was her first class and she really enjoyed it and was a complete natural too, very artistic.
So, would you like to come along next month? It is a techniques class next month (18th/20th and 21st June)
so perfect for beginners and, I promise, great fun if you are more experienced too!
Contact me now sarah-janerae@sky.com or 023 8084 3597 to reserve your place, cost is just £10 for each class or FREE with a £35 order! So why wait? Call now or for more details see the Card Classes tab across the top of my blog.
One last thing to mention I only have 1 share left of the Springtime Vintage Share, pop over for a look now to get your hands on it!
Thanks for looking, Stampin' Hugs,

Monday, 23 May 2011

3d Flower Card, Mounting it onto your card


Good Morning,
I hope you enjoyed yesterdays tutorial (you can see it HERE) and if you stuck with it right 'till the end then well done! If you have no idea what I am talking about, then please look in my side bar for a link.
If you do make one of these flowers then please send me the link, I would love to see :-D
And if I met you in Lyndhurst at the craft fair yesterday, then Welcome :-)
So, I promised you a way of mounting the flower onto your card, it is quite deep so I think it will be a jiffy bag job to send or better still, wrap your card in cellophane, tie it with a pretty ribbon and hand deliver to your friend.
I recommend mounting your flower through a mat on the front of your card, that way it isn't a little point trying to stick to the front of a card and possibly ripping off! eek!
So first you punch a 3/4" hole into your mat,


Next add your ribbon "leaves" I stuck mine with DST, attach the mat to your card with dimensionals then add a line of glue (tombow) around the circle and in the middle as shown,


Stick your flower holding the lower layer of petals to the mat to stick, (this is where tombow is great as it sticks quickly and firmly)

TOP TIP: Now I am sure most of you know/already do this but I will mention it anyway, just in case.
I decided that I wanted to spritz just my flower with shimmer spray, but I didn't want it all over the rest of the card. So I put post it notes all around tucked under the edges, spritzed and then removed them... quickly ;-)

And this is the finished card :-D
Sentiment is Curly Cute with Seam Binding ribbon leaves and Elegant Soiree DSP.

And a close up picture of the flower,
Well, I hope this has been of some help to somebody and I look forward to seeing your creations,
Stampin' Hugs,

Sunday, 22 May 2011

3d Flower Tutorial

Good Morning!
I love it when you make projects using my tutorials but please be sure to link back here and give credit when you make and post to your blog.
Thank-you for your understanding and I hope you enjoy this tutorial xx
Before we start I highly recommend a cuppa as this is a very long post! also I want to say I am not the original inventor of this flower, I have just made this based on lots of other 3d flowers available on w.w.web but adapted it for use with SU! Fun Flowers Die :-) Finally, you should be able to click on each picture to make them larger. All materials used are Stampin' Up! and available to purchase through me :-D

 O.K. this is what you will need, you will get this flower from one sheet of 6x6 DSP, double sided paper is best (all SU! paper is double sided) this one is Elegant Soiree, tombow glue (great as it sticks quickly and firmly) Fun Flowers Die (SU! exclusive), Big Shot die cutting machine, trimmer to cut your paper into 7.5 cm squares, bone folder, sponge and ink for the petals.
TOP TIP TIME!   When I get a new Die, I always measure each image and write the sizes on the back of each die, as shown. It saves loads of time and you don't waste loads of card or paper (although I always add an extra bit in case it slips) or time measuring and marking ready to cut.
Next up, layer up the paper, you can cut all 4 sheets at the same time, and run it through your SU! Big Shot,


Once you have die cut your flowers you need to leave the first flower whole, cut a straight line into the middle of flower no:2, cut out one petal from flower no:3 and 2 petals out of flower no:4


Ink the edges of each flower with a sponge or dauber then curve downwards using your bone folder,

Now take the whole flower, gently fold into 4 and trim the bottom point off,
Next, take the flower with just the cut in and before you glue fold around onto the next petal then trim the bottom off this too, TOP TIP: it just makes it much easier to fold and stick completely level with the petal that will be underneath,

Do the same with the other two flowers with one and two petals missing,
Take the double and single petal pieces and roll with the pattern the opposite way round as picture, rolling the single petal tighter to fit inside the two petal piece, again trim the bottom off of these pieces so they will sit at the same height as the other layers,
Start to assemble by gluing at the bottom of each piece from the middle outwards,
this is what the bottom will look like, you need to trim the last bit you can off,
then I punched a 3/4" circle from a scrap left over from from die cutting the flowers,
Stick it to the bottom of the flower by cutting like so,
and this is what the bottom will look like in the end, nice and neat ;-)
Phew! Well if you are still with me well done! I did say it was a lot of pics didn't I?
So, this is what you should have at the end of this tutorial, I hope it makes sense, if not then please do let me know :-D
And if I can help you get your hands on any of the products shown today then don't hesitate to get in touch.

 Edit to say: HERE is the link to see the finished card with a few more top tips for how to attach it securely!
 Stampin' Hugs and big thanks for dropping by today, 
Sarah-Jane xxx
Related Posts Plugin for WordPress, Blogger...