Showing posts with label Tutorials. Show all posts

Saturday, 18 November 2017

Tri-Fold Snowman Poop Tic Tac Holder. FREE Tutorial!

Hello!
This time last week I was in Birmingham at Stampin' Up's OnStage event, swapping and learning and generally having a ball! Sadly, this week it's back to work ;-)
But, I have finally got around to editing the photos of the swaps I made and I also have a little photo tutorial on how to make them too! Let's see....
 Inside a sentiment and Snowman Poop, of course ;-)
 You *may* recognise this adorable Snowmen from Seasonal Chums and the background was stamped using Smitten Mittens.
 Stamp, cut, score , fold and stick ;-)
TIP: If you are making multiples of these change that order to: Stamp, score, cut, fold and stick!
TIP: It's not very often I suggest punch the card first, then stamp. But for this it maximised the amount of labels you can get from a sheet of card and photopolymer stamps make this super easy to stamp.
Secure closed with twine.
TIP: I tied a knot before tying the bow as it was much easier to hold it secure this way!
I made about 36 of these holders but somehow managed to stamp and colour more snowmen that I needed! And after spending several hours colouring I wasn't going to waste those bad boys, so I added them to some Treat Tubes I still had!
And here they are all together!
 If we swapped in Birmingham, I'd like to say a big, huge thank you! I had lots of really lovely swaps in return and I love them all! *mwah* 
 And now for my oops moment. Apparently this snowman was stuck to the holder a little crooked and of course that's the one I choose to photograph! Doh! f you got this in a swap, I apologise, I honestly didn't notice and obviously I didn't spot it when I took the pictures either! Lol!!
Well, that's it for me for today, I really do hope you have enjoyed today's tutorial? Let me know in the comments...
     Shop Online With Me
Stampin' Hugs,
Products Used to create this project:
Coming soon...

Saturday, 22 July 2017

Making the Daisy Delight DSP the star of the card! And a Video Tutorial!

Hello there,
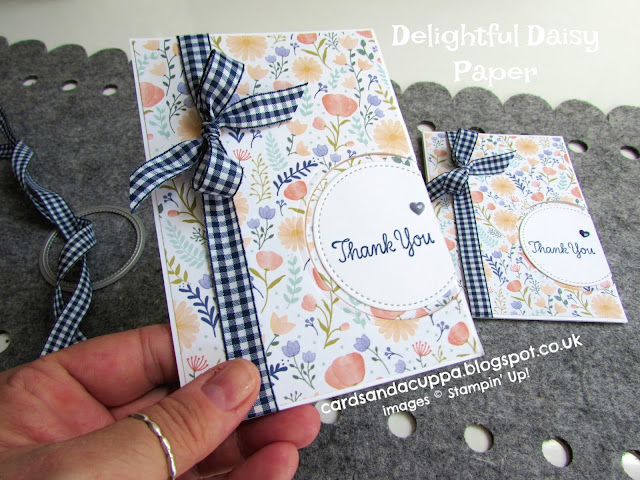
Today's card is one I made with the most beautiful paper I have seen in a while! It's from the Daisy Delight pack and when I saw it I really just wanted to make it the star of the card.  And so that's exactly what I tried and I ended up making these cards...
 I just can't seem to stop using the super lovely navy gingham ribbon (see another, different card HERE), it goes with everything and ties such lovely bows...
 Still love the stitched edge dies :-)
So, I thought I would make a super quick tips video for you sharing how to make this card including how to tie a ribbon bow so it sits straight, like on this card.
So, here's the video. Please note I inadvertently used a smaller stitched die for the card in the video, to fit the larger sentiment use the second smallest stitched die and a slightly larger circle :-) Oopsie!
 and finally both the original cards together again to finish today!
Well, that's all from me for today. Back tomorrow with another card for you, I'd love to see you here!
     Shop Online With Me
Stampin' hugs,

Saturday, 15 July 2017

Coffee Cup Mini Gift Bag with Video Tutorial

Hello there,
I knew these coffee cups dies would make awesome little gift bags as soon as I saw them in the new catalogue! You may have seen my first make on Instagram the other day :-) What I didn't share there was the larger one too, but I did promise a video tutorial to go with it and today I have that, for both sizes :-)
This small version was my first design and how cool, it worked perfectly, first time!
This smallest bag easily fits a couple of individual chocolates or sweets in. 
How adorable would these be for the Christmas dinner table?? Just change the colours and papers to suit!! I'm definitely going to do that! Anyway, all of the cups today use the Delightful Daisy DSP, in case you were wondering ;-)
And so I went on to make a bigger sized one with the larger dies in the pack...
 I decided to make these a bit deeper too, so they fit a fun sized chocolate bar in easily. I think they would be great for birthday favours too... Oh, so many uses!!
OK, so here's the video for you :-)
**Please note: The measurements are not transferable between the cups. The bases of the cups are slightly different so please watch the part of the video for the cup size you want to make :-)**
And for those who prefer written measurements ;-)
Small Cup: 12.3cm x 3cm or 1.5" x 4+13/16"
 Long Side: score at 4.5cm and 7.8cm or 1+3/4" and 3+1/16"
Short Side: score at 0.5cm or 1/4" on both sides.
Handle: 1.5cm x 11cm or 5/8" x 4+3/8"
~~~
Large Cup: 15.1cm x 4cm or 5+7/8" x 1+3/4"
Long Side: score at 6cm and 9.1cm or 2+3/8" and 3+9/16"
Short Side: score at 0.5cm or 1/4" on both sides
Well, that's all from me for today. I do hope you have a go at making these. I loved them and hope you do too?
Thanks for looking today!
     Shop Online With Me
Stampin' Hugs,

Monday, 17 April 2017

Using SU! Perfect Mix Stamp Set with a FREE Ribbon Layering Photo Tutorial

Hello!
I have another card today using the Perfect Mix stamp set. This time I used the images in the set to create a background which I watercoloured in pastel colours using my SU! ink pads for what I think is a very 50's vintage feel, take a look....
 Again I stamped with Memento ink on shimmer white card to watercolour.
I was inspired by some spatulas I have here at home in these colours ;-)
 I have seen this ribbon effect a lot in SU! catalogues so I wanted to give it a go but I found it to be a little fiddly so I decided to make a little tutorial for you sharing an easy way of creating this effect, please scroll down!
 This is how I added the ribbon effect behind the sentiment on this card!
 and one final photo for today :-)
So, I hope you enjoyed todays card and little tutorial? Let me know if you have a go!
   Shop Online With Me
 I'll be back soon with more, 'till then,
Happy stampin'

Related Posts Plugin for WordPress, Blogger...