
Hello there,
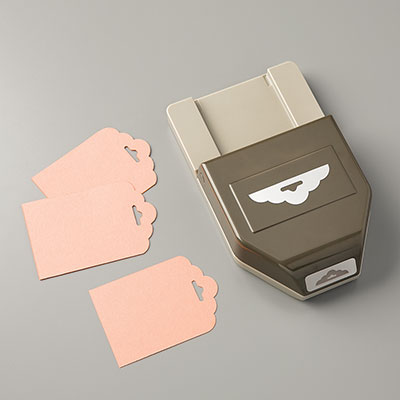
Today I have the second card from my "So Very Grateful" class a couple of weeks ago (the first one can be found HERE). This card uses the lovely Strawberry Slush combined with Crumb Cake and the new from the Spring/Summer catalogue Scalloped Tag Topper punch.
I love this punch and have seen a ton of this style of card around so decided to give it a try. OK, truth time {because I will always tell you if a technique is more hassle than it's worth!}: It is a bit fiddly to get the card in the punch but certainly not impossible (obviously) and I will definitely do it again. Overall, a great way to get more from your tag punch and let's face it, we all want to make the most use of the things we buy.
OK, let's looksie at the card....

We heat embossed the flowers (to make colouring easier) using Smoky Slate embossing powder then water coloured with blender pens and ink pads to get this look. I'm a big fan of stamping and colouring on Crumb Cake, It gives softer, more vintage style to your card.

Tag punched side.
There are lots of tutorials out there on the web (so I certainly don't claim to have any hand in inventing this) but briefly all you do is feed the side of your card base into the punch, carefully working your card under the guides either side of the punch, push the card all the way in to the back and punch. Then trim down to the punched tag top. Repeat then fold over the tag on the other side. (<< Hope that makes sense, if not then please drop me a line)
My TOP TIP: would be to use a scrap of card and measure either side of the punch to make sure your tag is in the centre, trim the spare card and keep as a guide for speedy positioning.

And a closer look at the tag made with the punch :-)
Background corner flowers were stamped using Versamark and the sentiment was stamped using Basic Grey Ink.

OK, that's all from me for today, I'll be back tomorrow with more :-)
Just before you go please don't forget the new
STAMPERS CLUB (starting now, join today!)
and
and
Stampin' Hugs,

Products Used to create this project:
 |
 |
 |
 |
 |
 |
 |
 |
 |
 |
 |
 |
 | |
 |
 |
No comments:
Post a Comment
Thank-You for any comments you may leave, I appreciate the time it takes to do so and I love to read them all :)